1. Showing Your Remotes
git remote. It lists the shortnames of each remote handle you’ve specified.
列出指定的每一个远程服务器的简写,如果已经克隆了自己的 repository,那么至少能看到origin,这是 clone repository 服务器的默认名字
1 | $ git remote |
git remote -v. 会列出urls和shortname of remote
1 | $ git remote -v |
2. Adding Remote Repositories
git remote add <shortname> <url>,指定一个远程仓库的简写名称 shortnamegit remote -v查看刚才添加的git fetch <remote-name>fetch 拉取远程仓库中有但自己没有的信息,我们可以直接使用<remote-name>
The command goes out to that remote project and pulls down all the data from that remote project that you don’t have yet.执行完后,将会拥有那个 repository 中所有分支的引用,可以随时合并或查看
- ps.
git fetch会将数据拉取到本地仓库,但并不会自动合并或修改当前的工作,You have to merge it manually into your work when you’re ready.
If your current branch is set up to track a remote branch (see the next section and Git Branching for more information), you can use the git pull command to automatically fetch and then merge that remote branch into your current branch.
git pull命令会fetch数据并且mergeremote branch 到 current branch,运行 git pull 通常会从最初克隆的服务器上抓取数据并自动尝试合并到当前所在的分支。
3. Pushing to Your Remotes
git push [remote-name] [branch-name]将 master 分支推送到 origin 服务器时(git clone 一个 repository 会自动设置好这两个名字)
1 | $ git push origin master |
如果在 push 之前有人 push 过了,当前推送就会被拒绝,需要先 pull 下来(fetch and merge)合并到自己的里之后才能推送
查看 remote repository
1 | $ git remote show origin // show <remote-name> |
4. Renaming and Removing Remotes
- 重命名 名为 test 的远程仓库 为 haha
1 | $ git remote rename test haha |
这同样也会修改远程分支名字,那些过去引用 test/master 的现在会引用 haha/master
- 移除某个远程仓库
1 | $ git remote rm <remote-name> |
2. Git Branching
1. Creating a New Branch
let’s create a new bracnch called testing, this creates a new pointer for you to move around.
创建了一个可以移动的指针
1 | $ git branch testing |
Git keeps a special pointer called HEAD, In Git, this is a pointer to the local branch you’re currently on. git branch 命令仅仅创建了一个新分支,并不会自动切换到新分支中去,HEAD仍指向主分支master
We can easily see this by running a simple git log command that shows us where the branch pointers are pointing. This option is called --decorate
1 | $ git log --oneline --decorate |
You can see the “master” and “testing” branches that are right there next to the f30ab commit.
查看项目分支(本地和远程)
git branch -a
删除本地分支
git branch -d <branchName>
删除远程分支
git push orign --delete <branchName>
本地关联远程分支
$ git push --set-upstream origin <localBranchName>
2. Switching Branches
To switch to an existing branch, we run the git checkout command.
1 | $ git checkout testing |
This moves HEAD to point to the testing branch.
- ps.
HEADpoints to thecurrent branch
这个时候我们已经切换到 testing 分支,如果此时我们修改文件并提交
1 | $ git commit -am 'test branch' |
那么我们的 testing 分支向前移动了,但是 master 分支没有,它仍然指向原来的对象
我们切换回master
1 | $ git checkout master |
It moved the HEAD pointer back to point to the master branch, and it reverted the files in your working directory back to the snapshot that master points to.
- 1.
HEAD指回 master 分支, 2.工作目录恢复成 master 分支所指向的快照内容.
3. Divergent history
1 | $ git log --oneline --decorate --graph --all |
it will print out the history of your commits, showing where your branch pointers are and how your history has diverged.
1 | $ git log --oneline --decorate --graph --all |
3. Basic Branching and Merging
1. Basic branching
you can run the git checkout command with the -b switch:
相当于新建一个 iss53 分支, 并切换到分支上, checkout 检出到某个分支上(HEAD 指向它)
1 | $ git checkout -b iss53 |
git branch查看当前分支, 它会列出所有分支,当前分支前有一个*号
1 | git branch |
在分支中修改完后提交git commit -am '',再切回主分支中合并 testing 分支git merge testing
1 | VueFe@Thinkpad MINGW64 /d/Notes/Git (master) |
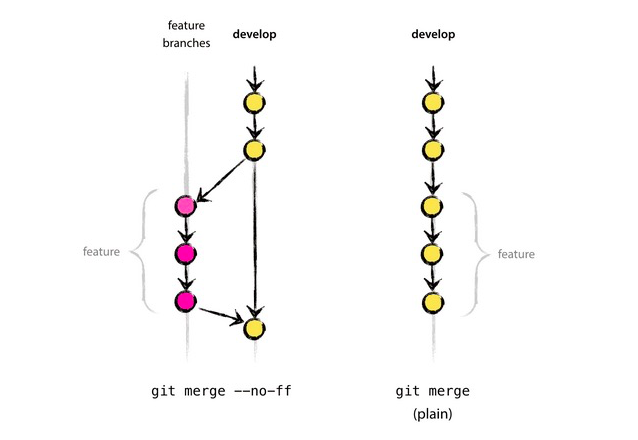
-ps. git merge --no-ff testing 使用--no-ff,会在 master 分支上生成一个新的节点,保留分支的 commit 历史.
when you try to merge one commit with a commit that can be reached by following the first commit’s history, Git simplifies things by moving the pointer forward because there is no divergent work to merge together — this is called a “fast-forward.”
当我们合并两个分支时,如果顺着一个分支走下去能够达到另一个分支,那么 git 在合并两者的时候,只会简单的将指针向前推进(指针右移) 这样的合并不会有冲突
2. Deleting Branch
删除分支git branch -d testing
1 | $ git branch -d hotfix |
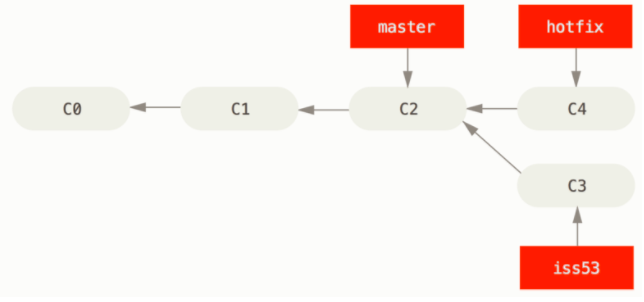
之后我们切回#53 继续修改,并准备合并 iss53 到 master
1 | $ git checkout master |
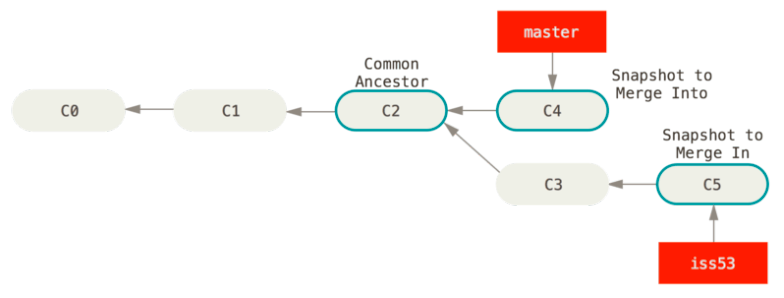
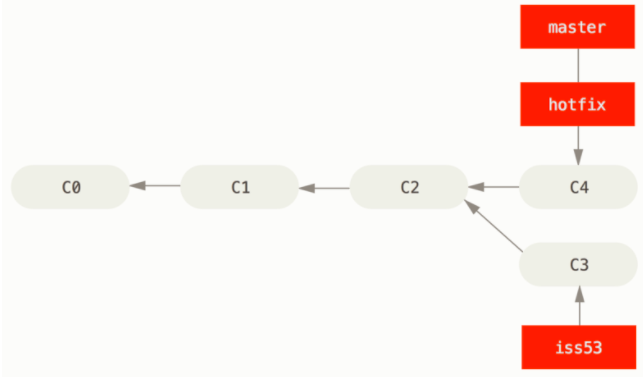
In this case,master分支所在的提交并不是iss53分支所在提交的直接祖先.Git 会使用两个分支的末端所指的快照C4和C5以及两个分支的 Common Ancestor C2,do a simple three-way merge
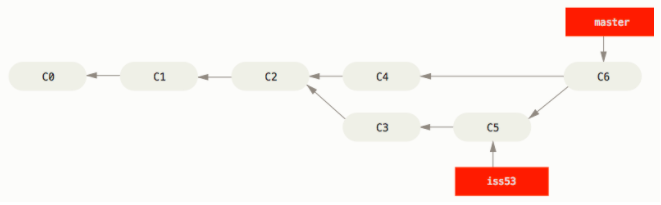
Instead of just moving the branch pointer forward, Git creates a new snapshot that results from this three-way merge and automatically creates a new commit that points to it. This is referred to as a merge commit, and is special in that it has more than one parent.
三方合并的与之前的 fast-forward 不同之处在于它(c6)不止有一个父提交(c4,c5)
合并完后我们可以删掉iss53分支了git branch -d iss53
3. Basic Merge Conflicts
If you changed the same part of the same file differently in the two branches you’re merging together, Git won’t be able to merge them cleanly.
当我们在不同分支中对同一个文件的同一个部分进行了不同的修改,并试图合并两个分支的时候,就会产生冲突merge conflict
1 | $ git merge iss53 |
At this point,git hasn’t automatically created a new merge commit.It has paused the process while you resolve the conflict.If you want to see which files are unmerged at any point after a merge conflict, you can run git status:
1 | $ git status |
Git adds standard conflict-resolution markers to the files that have conflicts, so you can open them manually and resolve those conflicts. Your file contains a section that looks something like this:
1 | <<<<<<< HEAD:index.html |
HEAD指示的版本 version(master 分支所在位置,因为当我们运行 merge 命令时已经检出到这个分支)在=======区域上半部分,iss53所指示的版本在=======下半部分,In order to resolve the conflict, you have to either choose one side or the other or merge the contents yourself.
解决完冲突后,我们对每个文件使用git add来标记冲突已解决.